.

With all of our modern technology and multi-tasking devices these days, it almost seems absurd to create an object that has one simple purpose. But I think it's for that exact reason that I love my little clothespin bag. Its old-fashioned single-purposeness takes me back to a day when we did things one at a time, slowly and with intent to do it right the first time. Those were the days. (Now everything is instant, everybody gets a redo, and nobody seems to try very hard at anything.)
The two best things about my little bag, however, are that (1) it was free, and (2) it took less than 30 minutes to make, start to finish.
Here is a little tutorial so that you may create your own. I apologize in advance for the lousy iPhone pictures. My camera battery won't hold a charge and I have to decide whether to invest in a new battery or a new camera (which is just another example of why modern devices aren't as good as the old ones).
I created my clothespin bag out of an old dress shirt that was in my stash. Men's dress shirts are invaluable because even after they get a little ragged around the cuff and collar the fabric still has loads of life left. I never discard an old dress shirt. First I cut off the buttons and save them, and then I put the shirt in my fabric stash for quilt squares or odd jobs such as this. They also make great craft smocks for the little kids -- just cut off the collar and cuffs with a pinking shear (or sew across the cut edges with a zigzag stitch) and turn it around backwards. And if you don't plan to do anything crafty with dad's old shirts, just put them in the dress-up box -- they'll get used.
If you don't have an old men's shirt, choose some fabric from your stash -- something durable but not too heavy. For the sake of this tutorial I am going to assume you will use a shirt --you can ignore that part if you are not.
Starting on your clothespin bag, lay the shirt out on a flat surface and with scissors or a rotary cutter (and board) cut two pieces from the front panels (or the back if you used the front) that are about 11 inches by 18 inches, give or take. If your shirt is smaller or larger than mine you may have more or less room. Cut your pattern to fit your cloth (I love that saying). Just place one front panel on top of the other to cut so they are identical. You may have a pocket on the shirt panel that you feel is "in the way" of cutting one of the panels. Just cut right through the pocket -- it will be on the back panel and it won't matter a bit.

I just sketched this without a ruler or compass, so my measurements are not at all to scale, nor are my lines straight. ;-)
After you have two identical pieces, take the piece without the pocket (if you have one) and, using a plate or other round object, mark and cut a hole that is approximately five inches across and in the top half of the piece (but centered from side to side). I actually just guesstimated by choosing a center point and folding the fabric into quarters with the spot at the center and then cut a small pie shape, creating a circle in the opened fabric. It's not rocket science. Just make sure the circle is centered and not too large, but large enough that you can fit your hand in. It will seem larger once you get the binding on. I actually think mine is more of an oval now that I look at the photo of the unfilled bag, but it stretches to a circle with the pins in it. If you can make an oval, go for it. It works.
Now, take a piece of binding (I used quilt binding which is wider than standard binding and which I think works well for this purpose, but use what you have in your stash), and pin it to the opening you just created (I started at the side), making certain that you catch enough of the shirt fabric that you have a secure seam. Just slip the open edge of the binding over the fabric edge and pin it in place. Cut the binding when you have pinned it all the way around, just overlapping a little bit of the top edge over the inside edge. Stitch the binding on, overlapping the ends.
Now place the piece with the opening, right side down onto the other piece, which will be right side up. Pin in place. Sew together, using a quarter inch seam allowance, starting at the top just about a quarter inch away from the center point, making sure the stitches are secure at the beginning (use a little back and forth stitching). Stitch all the way around (I curved my corners a bit), ending about a half inch from your starting point across the center line from the starting point, making sure stitches are secure at the end as well. You want to leave this opening in the top seam to slip your hanger through.

Unfortunately the binding is positioned in the picture just so the top opening is obscured.
Now, take a wire hanger (the kind that the dry cleaners uses for pants -- pull off the cardboard part) and place the wire hanger on top of the clothespin bag. Using a pliers, bend the hanger at the points where it reaches the edges of the bag. Bend it 180 degrees, making sure it isn't stretching the fabric. Mine was just the right size that I could hook the ends together in the center.
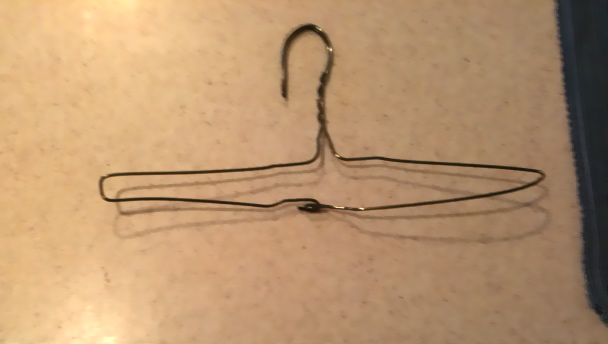
Now insert the hanger into the bag, gently slipping it through the opening in the top seam, bottom of the hook first. Now the bag will hang on the clothes line.

The end. (I think. Leave me a comment if I left something out or you have questions.) This little bag won't win any awards for design or creative beauty, but it's free, and easy, and you'll love that you made it every time you use it.
.
Thanks! I need to make one of these and have been meaning to take a moment to figure it out...and you just saved me some brain power. This is so helpful!
ReplyDeleteWonderful! Thanks so much for posting the tutorial.
ReplyDeleteI might even be able to manage this! :)
ReplyDeleteThanks for writing this up. I'll have to keep this for the spring - then I will have to make one. =)
ReplyDelete