
I apologize that it has taken me so long to post this tutorial. I took photos as I made the first skirt, but then I never got good pictures of the girl in the skirt -- the final product. I finally decided I would just have to show the skirt without the girl (above), as you have already seen the girl in the second skirt (below).

This skirt is a simple sew -- no pattern needed, all straight lines. The numbers (cutting widths) are very particular to the person for whom you are making the skirt. My daughter is eight years old and wears a size 8 slim. I wanted the skirt to fall just past her knees, so I measured her (total length from waste to just below the knee), divided (by three panels) and added (seam allowance, hem and waistband). You can also use a skirt that currently fits to get your measurements.
What I ended up doing was making each panel 8 inches deep, and even though the finished top panel was not as deep as the middle panel because of the waistband and the bottom panel was not as deep as the middle panel because of the hem, that was o.k. because the top and bottom fabrics were the same and you could see plenty of it. I just confused you didn't I?
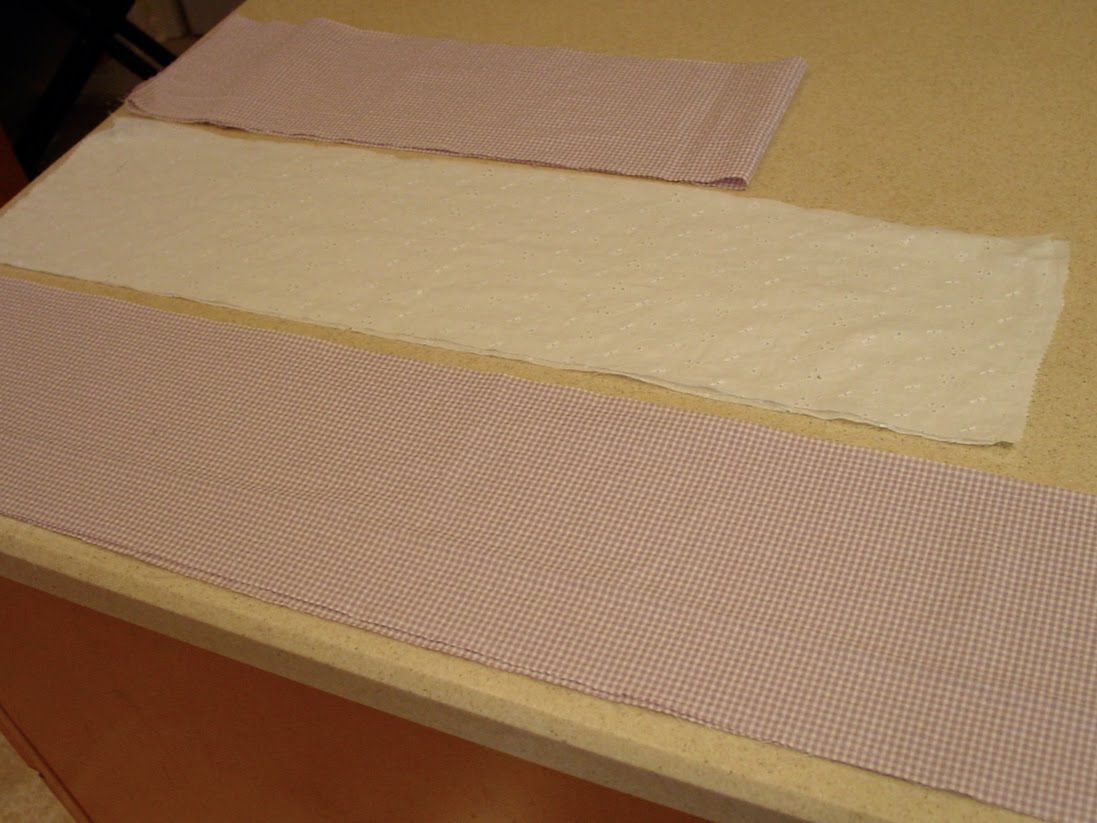
You can choose whatever fabrics you like. I used a seersucker purple and white gingham for the top and bottom panels of the first skirt, with a white eyelet middle panel. For the second skirt I used a blue with yellow and white daisies for the top and bottom and yellow with white, blue and green daisies for the middle.

Just pick two or three fabrics that coordinate and you'll be fine. I chose my fabrics based on the colors of tops my daughter already had in her closet, so I could make outfits.
Wash and iron your fabric first. Then you cut tiers. My tiers/panels were 8" x 48" -- for the top panel, 8" x 68" -- for the middle panel, and 8" x 92" inches -- for the bottom panel. That's roughly twice her waist measurement (for the top tier), then 1.5 times that number (for the middle tier) and 1.5 times that number (for the bottom tier), altered slightly to suit the width of my fabric. (I always say "cut your pattern to fit your cloth.")
Let's call the top tier A, the middle tier B and the bottom tier C.
A = waist measurement x 2
B = A x 1.5
C = B x 1.5
A, B and C were all 8 inches deep.
So, after you wash and iron your fabric, cut your panels. For the B and C tiers, you will likely have to cut two widths and sew them together (right sides facing) to make one long panel (most fabric does not come wide enough unless you are making a wee tiny skirt, and if you are making a very large skirt, you may have to cut three pieces). After you piece together the B and C tiers, sew the A edges together, the B edges together and the C edges together (all right sides facing) -- essentially creating three large bands of fabric (see photo).

Next, take the B tier and sew around the top using a long basting stitch, about 1/2 inch from the raw edge. Pull the bobbin thread, gathering B until it is the same length as A.
With right sides facing, pin the top, gathered edge of tier B to the bottom edge of A, lining up the side seams (tier A will probably only have one side seam, just make sure the gathers are even and B's other seam is at the other side of A ). Then baste, using a 1/2 inch seam allowance, adjust gathers to keep them fairly even around the skirt. Check to be sure you're happy with the way it looks (don't worry if you can see basting or gathering stitches -- you won't later) then stitch with a 5/8 inch seam allowance. Trim the raw edge with a pinking shears or stitch them with a zigzag stitch to keep them from fraying (if you pink the edges be careful you don't cut into any fabric that shouldn't be cut -- always know what is between the blades).

Iron toward tier A.

Now you will repeat for the C tier. Iron toward tier B.
Now, stitch both seam allowances to the tier above it (A and B) from the right side using a 1/4 inch seam allowance. I like to do this because the skirt washes better that way and looks nicer longer.

Once you have your three tiers sewn together and top-stitched, you will create a waistband and a hem. For the waistband, iron a 1/4 inch fold along the top edge of the skirt on the wrong side (my seersucker is a woven so both sides are the same).

Then iron another fold 3/4 inch from the first fold. I used 1/2 inch elastic -- if you use a wider or narrower elastic make your casing to fit your elastic.

Stitch close to the edge leaving a 2-inch opening to start the elastic through.

Thread the elastic through the casing, adjusting the gathers. (To determine the length of your elastic, measure your daughter's waist and cut the elastic slightly shorter -- you want it to stretch when the skirt in on).

Overlap the raw edges of the elastic slightly and stitch with a zigzag -- back and forth. Close the opening of the casing with a straight stitch.
For the hem: iron a fold 1/4 inch from the bottom edge of the skirt on the wrong side. Then again 1/2 inch from the first fold. Stitch close to the first fold.
Then all you have to do is iron and you're finished. Any questions?
© Praying for Grace. Please ask permission before copying any text.
.
Yes, what is this activity you speak of called "iron"? :)
ReplyDeleteI'm just kidding. It looks lovely! I think I might just try one for each of my girlie girls.
Haha! You don't fool me Charlotte. I know you iron and you love it!
ReplyDeleteIs 43 too old to wear one of these? :) It looks so cool and comfortable!
ReplyDeleteI'm going to have to print this post up and try this....some time, really I want to sew, and cute skirts like this make me want to even more!! My girls would love these!
ReplyDeleteOh thank you!!! I will try this!
ReplyDeleteSheila -- Heck no! You could pick some very grown up fabrics and make a pretty skirt for yourself.
ReplyDeleteJamie -- when I wrote this tutorial I had you in mind. I know you can do it!
Be sure to post pictures, Amy.
Pretty skirts and wonderful tutorial! :)
ReplyDeleteI am going to try this! With my mom's sewing machine ... and her help! But am I going to have to make four, one for each girl??!?
ReplyDeleteThank you, Cheryl.
ReplyDeleteSarah, absolutely you are. You probably won't need more than a yard of fabric for your little girls, but maybe a yard and half for you oldest. It would be so cute to have them all in coordinating colors!
How cute! My girls would love this! I'll have to save this for when I attempt sewing again. Someday! :-)
ReplyDelete